Welcome to the session of Iris bulb, whose beauty can flourish under your tender care plan. Ensuring the health and vitality of your iris bulb is essential for a thriving garden.
So, how to tell if Iris bulbs are good?
I’ll offer expert advice and practical tips to help you confidently select the best bulbs and nurture them to their fullest potential.
Whether you are a seasoned gardener or a beginner, let’s embark on this journey to unlock the secrets of successful iris bulb care!
About Irises
Are iris bulbs? Yes, The Iris bulb – a perennial flowering plant belonging to the genus Iris, has captivated garden enthusiasts for centuries with its stunning beauty and remarkable diversity.
Originating from various regions across the globe, including Europe, Asia, and even North America, etc., these bubs have a rich cultivation background.
And their characteristics differ throughout the regions (e.g., Japanese Iris and Siberian Iris).
The plant is renowned for its striking and intricate blooms, which come in a wide range of colors (vibrant purples, blue, yellow, and whites).
Their fan-shaped left, coupled with sword-like foliage, make it become an ornamental plant to any greeneries.
It is an easy-going flowering plant as it can adapt to various climates and soil types, making it a versatile choice for gardeners. These hardy bulbs thrive in both sunny and partially shaded areas.
Their low-maintenance nature makes them a popular choice for both beginners and experienced gardeners.
How To Tell If Iris Bulbs Are Good?
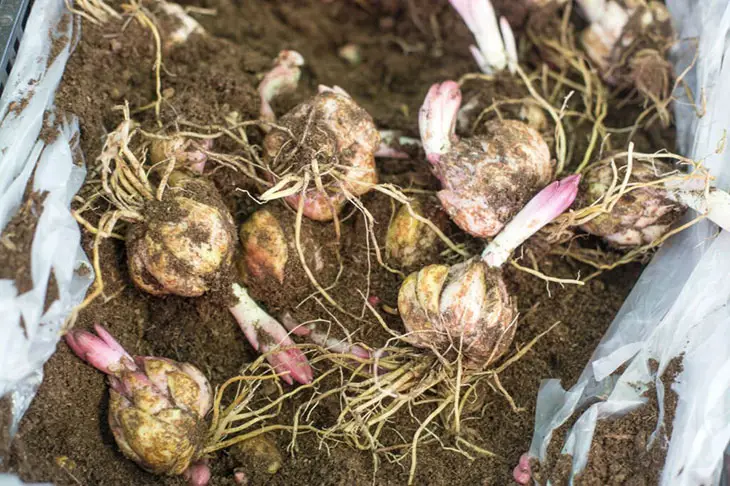
A high-quality Iris bulb should feel heavy and hydrated with viable rhizomes. Specifically, its rhizomes have to be firm, free of damage, diseases, or infections.
Stay away from mushy, lightweight, or discolored bulbs.
Assess Its Weight
A good Iris bulb should feel heavy for its size. This indicates that it is well-hydrated and contains ample nutrients to support growth.
Lightweight bulbs may be determined to be dehydrated or lacking in essential nutrients.
Examine The Rhizomes
What are iris rhizomes? They are the thick and root-like structure of the Iris bulb, and their health is the key indicator of bulb quality.
Healthy rhizomes should be plump, firm, and free from signs of damage or decay. Avoid bulbs with shriveled or mushy rhizomes, as these may not be viable for planting.
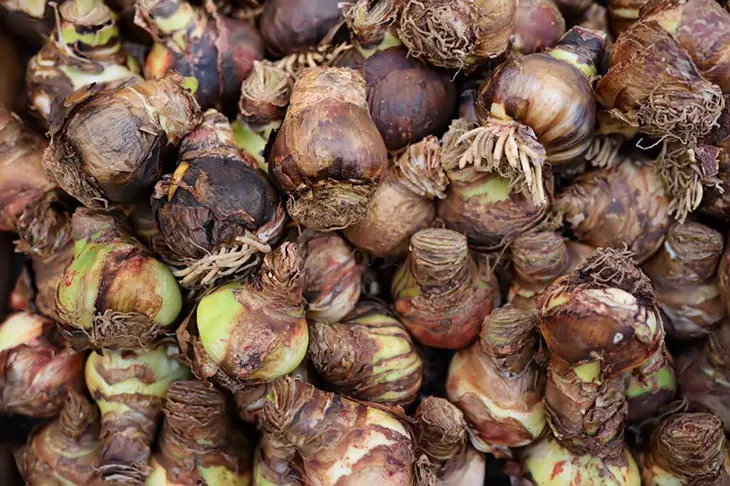
Look For Discoloration On The Rhizomes
Inspect the rhizomes closely for signs of discoloration, such as dark spots or mold. Discoloration can indicate fungal or bacterial infections, spreading to your entire garden if not addressed promptly.
Opt for bulbs with clean, blemish-free rhizomes.
Check For The Rhizomes’ Firmness
What is an iris rhizome? Now you know it! You can gently squeeze the rhizome sections between your fingers. A good Iris bulb will have rhizomes that feel firm and resilient, indicating vitality.
Bulbs with soft or mush rhizomes may be compromised and less likely to thrive when planted.
Select The Large Rhizomes
Larger Iris rhizomes tend to produce more robust and multiple plants. While smaller bulbs can still grow into healthy irises, please opt for bulbs with larger rhizomes.
The larger the bulbs, the more energy and resources are stored to support the later vigorous growth and flowering.
Remember that the specific requirement for Iris bulbs may vary slightly, depending on the Iris species or variety you are working with.
It’s a good idea to research the specific needs of the ones you intend to plant.
Additionally, choosing Iris bulbs in a reputable garden center or local nursery can increase the likelihood of obtaining high-quality bulbs.
Care Requirements For Iris Bulbs
When To Plant
Timing is always the firm base. Irises are typically planted in late summer or early fall, ideally 4-6 weeks before the first frost in your area.
Growing during this period allows the bulbs to establish their root systems before winter settles down.
This way, you can ensure they are well-prepared to flourish into an abundance of colorful blooms in the spring.
How To Plant Iris
Select A Suitable Location
How to plant iris rhizomes? First, choose a place with well-draining soil and obtain at most 8 hours of abundant sunlight daily. Irises have their moment in sunny spots.
They can also tolerate partial shade. If your garden spot lacks sunlight, please consider relocating or installing a grow light.
Prepare the Soil
Please loosen the soil to a depth of about 12 inches. In this process, please remove any weeds, rocks, or debris around. You should add organic matter like compost to improve soil quality and drainage.
Planting Depth
How deep to plant iris rhizomes? Iris bulbs should be planted about 2-4 inches deep, with the pointed end facing upward. Do not forget about the importance of spacing.
How far apart do you plant iris bulbs? Please space them approximately 12 to 24 inches apart for better air circulation.
Watering the Soil
Water the newly planted bulbs thoroughly to calm the soil and remove air pockets. Then, keep the soil consistently moist but not waterlogged, especially during the growing season.
Mulch
Mulch helps retain moisture, controls weeds, and maintains a stable soil temperature. A common mistake among inexperienced is to cover the Irises with mulch.
The plant prefers to be near the surface as much as possible. Please be cautious of this characteristic!
Fertilization
Normally, people think of high-nitrogen fertilizers or nitrogen-rich soil. However, this type of fertilizer can encourage unnecessary excessive foliage growth at the expense of blooms.
I suggest using a balanced and low-nitrogen fertilizer in the spring when new, healthy growth emerges and again after flowering.
How to Care For Irises
Everything will not stop when your Iris bulbs are in the ground; proper extra care and maintenance are crucial for their continued health and beauty.
Irritation
Planting Iris, you can note their consistent moisture preference. That’s why healthy plants should obtain above 1 inch of water weekly, either from rainfall or manual watering.
Deadheading
After Iris flowers have finished blooming, please cut off the spent bloom to trigger new growth as well as prevent seed formation. This redirects the plant’s energy back into the bulbs for the next season.
Division
Irises benefit from division every 3-4 years, maintaining the plant vigor and preventing overcrowding. This involves carefully digging up the rhizomes and separating and replanting them in fresh soil.
Pest and Disease Control
Keep an eye out for common Iris pests like aphids and Iris boers. If you detect any sign, please promptly take appropriate measures to control infestation.
Additionally, practice good garden hygiene to minimize the risk of Iris diseases.
Winter Protection
A layer of mulch over the Iris bed is the solution to insulate the bulbs from colder days or harsh winter weather. When the spring comes, please remove this covering for the new growth.
4 Steps To Rejuvenate Irises

Step 1: Carefully Dig Up The Clump Of Irises
You can use a garden fork or a spade to loosen the soil around the clump gently, taking care not to damage the rhizomes.
Please gradually lift the clot out of the ground, shake off excess soil, and place it on a clean surface.
Step 2: Discard Any Rhizomes With Small Holes
Let’s inspect the home closely when the Iris clump is out of the ground. Look for any signs of damage or decay, including small, individual holes or mushy spots.
These can be indicative of common garden pest infestations or fungal issues. You are advised to discard any compromised rhizomes to prevent the spread of problems to the healthy ones.
Step 3: Take The Remaining Rhizomes And Clip The Leaf Fan
After removing the damaged rhizomes, you should be left with healthy ones. Use a clean pair of pruning shears to trim the leaf fan, promoting rejuvenation and new growth.
Clip the leaves back to a length of about 6-8 inches and then remove any yellowing or damaged foliage.
This way, you can reduce stress on the bearded Irises and redirect its energy to the rhizome for future growth.
Step 4: Replant the Rhizomes
With your trimmed and healthy rhizomes, it’s the perfect time to replant them. You can choose a well-drained, sunny location in your garden.
Please dig wide holes to accommodate the rhizomes and ensure they sit a little below the soil surface.
Plant the rhizomes about 12-24 inches apart for proper air circulation. Water the newly planted rhizomes thoroughly to settle the soil.
Rejuvenating your Iris garden is a rewarding process that can breathe new life and vibrancy into your outdoor space.
Conclusion
You already know the criteria of how to tell if iris bulbs are good, namely weight, rhizomes, discoloration, and bulb size.
Besides applying these principles, you can revitalize your Iris plants and look forward to a future season filled with the stunning beauty of Iris blossoms.